
How I became a microscopist in
two weeks
| It's all about the light |
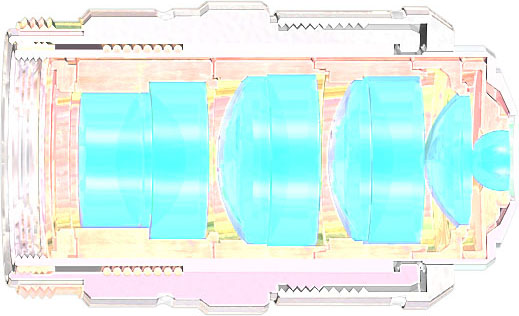
When I was a kid, I wanted to be a wildlife photographer. I used to hide out for hours on the beach, skulking behind a dune, just to get the perfect shot of something as un-exotic as a seagull or a frisbee-chasing dog. I didn't realize what good practice this was for doing Astrobiology until Lori roped me into taking photo-micrographs of the ice cores. A lot of things about microscopy are just like ordinary photography... but a lot of them are very different, too. I had to read a lot and play around with the instrument for a few days before I started to have an idea of what I was doing. The links on the left are my favorite tutorial sites for optics. They're found at the major manufacturers of cameras and microscopes for ordinary people and scientists. All of the sites are free, and I've also included some links to a couple of classic open-source books that are really impressive. The first step to taking any kind of picture is to understand how basic components, like lenses and filters, work. In microscopy, the lenses are designed to magnify the sample hundreds of times. Depending upon the sample type, thickness, whether it needs to be in water, etc. the lenses will have different properties. A huge number of different types of lenses are available for specialized applications in biology or other fields, such as materials science. Fortunately for me, all of the lenses on the microscope in the BSL-3 lab were right for what we wanted to do, so I didn't have to worry too much about that. A modern microscope lens is very complicated, and is actually made up of a collection of different lenses in order to optimize the image quality. Here's the inside of a microscope lens:
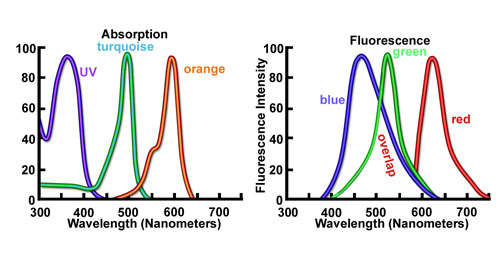
The next thing to think about was illumination sources and filters. In photography, you use the natural light of the sun, or the light of your flash, to illuminate the picture. In fluorescence microscopy, you use light to excite fluorescence from your sample, which then provides the light that you image. You can look at a guide to how fluorescence works on the linked page, or just note that fluorescence comes out with light a little bit less energetic than the light that excites it. Take a look at the rainbow at the top of the page--the most energetic visible light is violet, so it bends the most and ends up on the inside of the rainbow. More energetic still is ultraviolet (UV) light, which we can't see. Red is the least energetic visible light. So, to oversimplify a bit, UV light can make some molecules fluoresce blue; blue light will make others fluoresce green; green light will lead to orange fluorescence; and so on. This means that if we want to see three colors at once from a sample, we can hit it with UV, blue, and green going in, and look at blue, green, and orange coming out. The spectra of three typical fluorescent molecules are here:
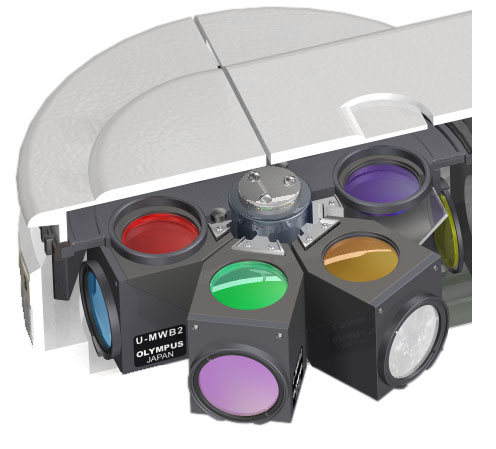
How do we choose the light coming in and out? We need a combination of a bright light source and special filters. What we used to illuminate the sample is a mercury lamp, which makes a powerful white light--light of all colors, including UV (which is why it's important to wear safety glasses around it). The wavelengths of light we want to hit the sample with can be selected by passing the light through "bandpass filters"--filters that will choose a broad or narrow range of light colors, depending upon their design. A picture of what filters for a fluorescence microscope look like are in the picture below. One side selects the colors coming in, and one side selects the colors coming out. The tricky part is to avoid overlap, or what we call "channel bleed-through." When you see green or red light, it's not a single wavelength--it has a spectrum like in the drawing above. The width and shape of the spectrum depend upon which dye you're using on or sample--or sometimes on the bacteria you're looking at themselves. If your filter is too broad, you will pick up some "green" in your "red" image, or some "blue" in your "green." This will make your data wrong or impossible to interpret. Ways to avoid this are to use dyes with very narrow spectra, so they don't overlap (but this is hard), or to use filters with narrow band passes in order to select out only the light that is specific for each channel. To get our 3 colors, we had to take 2 pictures, one right after the other, through different filters. We could see the green and red simultaneously, but in order to separate the blue, we had to take a picture of it separately using UV excitation that would only excite the blue. It's also important to note that we spent a lot of time looking for the brightest dyes possible. If your bandpass filters are narrow, you're only taking a very small amount of light coming from that dye--so your sample has to be really bright in order for you to see it! It's hard to win...
This is what filters look like mounted in a microscope. |
The pictures are taken on a camera mounted on the side of a microscope. Until recently, this camera was just an analog camera with film in it. In fact, in our BSL-3 lab that's still the case... but the instant Lori and I get our big grant, we'll get a beautiful new digital camera! Digital cameras for sensitive imaging are usually cooled to cryogenic temperatures to increase sensitivity, and can be upwards of $50,000. With an analog camera, you take your pictures to be developed just like in the old days--or you do it yourself in a darkroom. Since all our images were color, we took them in. We then got slides that we scanned on a slide scanner to make digital images.
Finally, once you have all of your pictures, you have to sort through them and interpret them. Just like with wildlife photography,you will probably take 10-100 pictures for every one that you use. The difference is that in science, it's unethical to digitally edit your photos. While it's perfectly OK to edit out a lion's red-eye or a hyena photobomb, scientific images can only be brightened or enhanced across the whole image. Any other manipulations, especially involving a selected area of the image, are unethical because they misrepresent the data. The brightness of your spot might indicate levels of expression of a certain gene, or the identity of a microorganism, or even how well your newly-invented dye works--so misrepresenting any of these is simply a lie.
Of course, if you're using your images for artistic purposes, you're free to do whatever you want! The next page has a gallery of some of my favorite images from our Astrobiology project.
| FROM OUR LAB | ||
|
||

| EXTRA PICS | ||
|
|
||